Wednesday, 11 December 2013

Hot and Cold miniatures

Hello everybody,
This is just a little update of some new models for I have for sale and some great model work that people have been doing!

Lets build a snowman!

As it's winter and Christmas is on the way, I made a little 28mm scale Snowman miniature!


The little cold chap is available from eBay here-
http://www.ebay.co.uk/itm/121223406142?ssPageName=STRK:MESELX:IT&_trksid=p3984.m1555.l2649

He comes as a body, textured base and two metal arms.


My name is Ozymandias!

From slightly warmer climes we have Ozymandias (also known as Ramesses II or Younger Memnon) statue ruin at 28mm scale. and also a 28mm scale Easter Island head!


Ozymandias is a solid hand cast resin miniature of the famous Younger Memnon (Ramesses II) statue as seen in the British Museum and made famous by Shelley's poem Ozymandias.

The statue is depicted half buried in the sand awaiting excavation. In later life the real statue had a small hole made in its chest but this model is made with out the hole. You can add it if you wish! The Hieroglyphics on the back of the statue are accurate.

The Easter Island head or Moai is also hand cast solid resin and its size is based on a typical Easter Island head. It's quite big!

I'm in the middle of painting both at the moment and photos of them should be on the blog in the following weeks.

Clever Boy!


Mike from The States has painted up one of the HO scale Police boxes for his new Train Layout and you can see more photos and follow his progress as he builds and develops his layout on his great Facebook page www.facebook.com/CentervilleHO

On the subject of Police Boxes, the new Half blue half transparent Police Boxes at 28mm scale (a companion piece to the solid blue Police Boxes) keep selling out but we should have some more in by the end of the week - so if you do want one, keep your eyes peeled on eBay tomorrow/Friday morning.


We are also making some fully transparent Police Boxes too and they should be on eBay at the same time.


Tuesday, 5 November 2013

Victorian Post Boxes and Demon Summoning Circles

Hello,
Bit of an eclectic mix this post with Victorian Post Boxes and Demon summoning circles! 

Post Boxes


I've finally had a bit of time off to do a little painting and thought I'd try and paint the newest items I've made, Victorian Post Boxes. Quite a few people have asked for me to make Victorian Post boxes and so I decided to make not one - but three different types. An early, mid and late Victorian. You can read about them here... http://en.wikipedia.org/wiki/Pillar_box


I'm rather happy with the results of these miniatures and managed to get some nice detail on the 28mm scale boxes. I think the Mid or 'Penfold' box is probably my favourite. I reckon that most people will imagine that post box if they think of Victorian pillar boxes. I'm rather happy that you can see and paint the words 'Post Office' on the side of the box.

The Early Grecian Column style post box looks so odd to modern eyes. It even has a vertical slot for the letters! It's also very small but I guess there was far less post back then.

The later box has a VR emblem on the front that I've painted in gold. It's kind of crazy to think that this late post box design has changed very little in all these years.


To paint the boxes first by spraying them with a black undercoat then a dark red. I then gave it a darker red wash before dry brushing it with a rich bright red. Then I painted the black bases, white for the 'collection plate' and gold for the detail. I used the dark red again for painting the little details like the locks and hinges. A very watery black wash was used on the 'collection plate' white to finish off. 


The unpainted post boxes are available to buy on my ebay page.


Summoning Circle

A model I made a while ago was the medium sized Demon Summoning Circle but I haven't managed to get around to painting it until now. You can see my painted Large summoning circle on this previous posts on the blog.


To paint this one I started with a black undercoat and dry brushed a few dark greys getting lighter and lighter. A liberal amount of brown wash was used to show all the rough detail on the sides. the stonework only really comes to life when a final light grey drybrush was used to bring out the detail of the stonework. I decided to paint the pentagram to try and make it look like lava. I'm not sure if I succeeded but what I did was to paint the lines with a dark red, then a lighter red. A red wash was used before then painting long splotches of orange, then in the splotches I painted yellow, then in the yellow I painted tiny bits of white. I then painted a gloss vanish over it to make it look a bit shiny. Silver was used on the pentangle and the demonic glyphs around the sides. the Glyphs do mean something by the way!

I added a few Lovecraftian monsters I painted a couple of years ago to this picture to help with the atmosphere, or should I say atmos-fear! 


This model is available to buy here http://www.ebay.co.uk/itm/111207157764?ssPageName=STRK:MESELX:IT&_trksid=p3984.m1555.l2649

Run Doctor, run!

Wayne from http://weirdwars.pbworks.com bought one of my Police Boxes and added the Doctor and Companion to a scene. As you can see he's just started the mini diorama but it's already looking quite promising! I would also suggest if you like Weird WWII sci fi stuff to check out his blog. It's crammed full of crazy diesel punk war vehicles. Tank Tripods and British UFO's! All expertly built and painted. Check it out!


Wednesday, 25 September 2013

Zombies, Rockets and Boxes

*Klaxon Klaxon Klaxon*

It's a Zombie Plague!!! Run for your lives!

*Klaxon Klaxon Klaxon*

Here's some pictures of my Sci Fi boxes with Greebles that have been expertly assembled and painted by a model maker called David who has made the boxes into decontamination chamber to be used to halt a zombie plague! Look out HazMat guys - there's zombies on the loose!


From the look at the army of zombies in his scene, I think the decontamination unit will be over worked and probably overrun by the undead.

I never envisaged the boxes to look militaristic like this, but I think the colour scheme really works well and the addition of all the little decals that David added to the boxes really brings it to life.

Rocket to the Moon

Modeller Peter posted some pictures on Facebook of Wernher Von Braun's V2 Rocket (at 1:144 scale) next to Von Braun's other famous creation, the Saturn V also at 1:144 scale. Rockets certainly grew up from 1942-1969! 


It's hard to believe that the little one is the Granddaddy of the biggest! Here's another pic from Peter of other rockets with the tiny V2 on the left for scale.


Also my 1:144 V2 has been reviewed by Internet Modeller Magazine and you can read it here.

Horten Ho 229

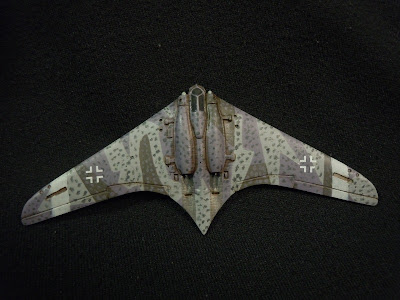
I was recently commissioned to paint two Ho-229's. One in a mottled grey camouflage and one weathered and messy like it was found by the GI's during the end of WWII.


After giving both of the planes an undercoat, I painted the mottled Ho-229 a dark grey before using Blu Tack to mask off the mottled shapes before painting with the light grey. The rust for the older worn out Ho-229 was made by dusting a rust pigment on top of the rough patchy painting and I used some dark pigment to dust the burning behind the engines. I also had some custom decals for them which are now part of the kits on eBay!

Last blog post I started with Ryan's brilliantly painted Horten Ho's and now he's painted more in a different and more menacing looking camouflage scheme. check them out!


He painted the shapes byu hand without masking and I think it looks really good!

AA Call Box

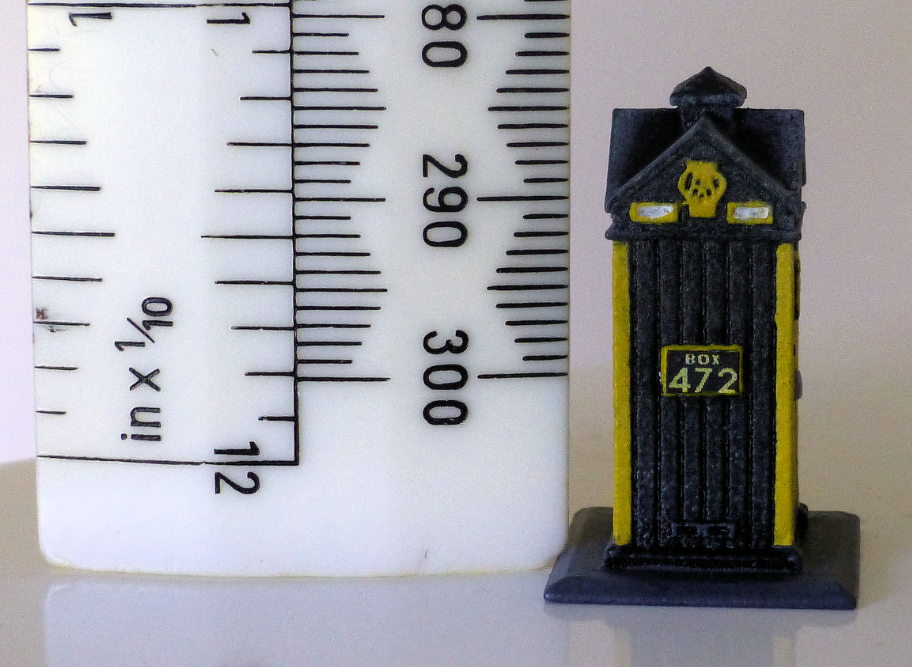
One of the early miniatures I made was of an AA Call box and I could not have made it without the hard work of Team 472 and there website which supplied great photographic research. Team 472 have restored the AA Call Box number 472 during the summer of 2009 and even made the inside a miniature museum! I painted up one of my 1:100 AA Call boxes, had some custom decals made to show 'Box 472' on the side and sent it to the team. John Holley of Team 472 has been very kind to upload photos of the model at these websites...

http://box472.weebly.com/press-coverage.html
http://www.flickr.com/groups/aaboxes
http://www.flickr.com/groups/box472

... where you can also read about their great restoration work!


Thursday, 29 August 2013

Painted Miniatures

Hi everybody!
This is a special blog post dedicated to the amazing work and talent of people who have so generously bought and expertly painted some of my miniatures. Just scroll down and take a look at some of the pictures. I'm so jealous!

Horten Ho 229

This WWII Flying wing was painted by Ryan in a maritime/coastal camouflage. Masking tape was used to help paint the camouflage and decals were used for the insignia.


I have recently painted two Horten Ho 229's myself. I painted them with a mottled camouflage using blutack to create the camouflage shapes. I'll no doubt be showing them on my next blog post.

Beside a country lane

This big and detailed scene by Craig is great, and sitting on the side of a lane is a little 1:100 post box.


This is only part of a larger TT Gauge train layout and it looks so rich and fantastic I think you agree. 

Steampunk TARDIS

Some of the police boxes I've made have been made into wedding toppers or chess pieces but recently some of the 1:72 scale Police Boxes have been made into Steampunk necklaces! A Mon Seul Desir.net from France has a website selling all kinds of jewellery like broaches, cuff links and necklaces in a number of different styles like Gothic, Steampunk, pop culture and now you can get a Police Box necklace! 


More Police Boxes

Brian from the USA painted a 1:72 Police box using Testors paints and creating the words by carefully using decals from his stash of decals!


I love the Police Box next to the Aston Martin!

Now here's the 1:100 Police Boxes as part of a fan made Doctor Who themed chess set! You can see that Kevin used them as rooks on the Doctors side of the board. Maybe the rules of this chess can change so that the TARDIS can materialise on any square of the board at any time during the game!


And the last of the Police Box models comes from Justin. The TARDIS isn't quite finished yet, but he's already done a fantastic job not just of the police box but of the set and the figures too! I love the Palace Theatre poster on the wall.


The figs and the TARDIS will be used in a game based on the famous Doctor Who adventure The Talons of Weng-Chaing where the 4th Doctor plays at being Sherlock Holmes in Victorian London. I am ashamed to say that I have not seen this classic serial, but I will hunt down a DVD and see it soon! You can read Justin's blog about his N Gauge model railway here!

It's a real Pea Souper

Keeping with Old Victorian London and Mr Sherlock Holmes, Neil has bought one of my 1:56 scale Victorian water pumps for his Huge and fantastically detailed Victorian London. The Layout was used for an Empire of the Dead game. Check out the pictures below and look carefully to find Sherlock Holmes and Jack the Ripper!


Epilogue

Some amazing stuff there, and although I am - as I said at the start of this post - slightly jealous,  I do also find it inspirational and I hope you find it that way too. :)

All the best! 

Wednesday, 17 July 2013

Sand Store and Furnace

Hello Everyone!
A short blog today just to show the latest 1:100 TT gauge model of a Sand Store and Furnace.

This model was requested from a member of the 3mm society. He was also kind enough to supply me with some photocopied plans and photos of the real thing from which to build the miniature :)

And here it is...


It measures 65mm x 33mm x 42mm and is available to buy from eBay here!

I've also been asked to paint some up from using the photograph as a guide. The Sand Store is a lineside hut that gets very very dirty so I used a lot of dark wash and also some dark dry pigment to make all the filthy smudges.

With one of the huts I added some rust patches using the paints and techniques from Citadel's How To Paint Miniatures guide. It needed some toning down though as the white of the roof really made the rust pop out too much and look a bit odd.

I also found that when painting some bricks a different colour to add a bit of variety, you can be quite bold with the pallet and use all of the flesh tones.

Oil on canvas

This part of the blog has nothing really to do with miniatures, but if you would like to look at some new paintings you might want to click here to see Elizabeth Leonard's ArtSpace. She's a Cardiff based painter with a wide range of styles. Check it out!

Epilogue

We have a few new models coming soon and as they get released, expect to see this blog updated. Also, yeomanmodels.com now has a holding page and a new website is being built. Yeah!


Tuesday, 14 May 2013

World War II Miniatures

Hello again,
Today's blog post is all about our World War II miniatures. We have our newest and biggest miniature yet, also a rather futuristic looking WWII German jet powered bomber as well as a round up of older ones I've mentioned on the blog before. After all of that there will be a little about what I'm planing for the future and a few links to look at.

First off, The Big One!


V1 Rocket and Launch Ramp

Above is a digital painting I made of the biggest miniature we've ever created. A 1:100 scale, Flames of War compatible V1 and Launch Ramp.
The V1 miniature measures 80mm x 53mm x 14mm and is cast in white metal and is also available to buy on it's own here.

The V1 Launch Ramp measures 39cm x 6.5cm x 6.5cm. The base and ramp pieces are made of resin and the ramp stanchions are made form a white metal.

The kit consists of 22 pieces.


Some parts are small and are cast in a white metal that contains lead. So for both these reasons this item is unsuitable for small children.

Printouts of the building instructions and information about the V1 and Launch Ramp are supplied.
This miniature's been a long time coming but it's finally here! We've worked hard to make this and I hope you like it! It's available from eBay here.

If you are interested in the V1 and Launch Ramp, there's a video of a German training film from 1944 on Youtube here. It's in German - I can't speak German but if anyone out there can and is able to supply subtitles for the film that would be excellent. I see that subtitles have been requested in the YouTube videos comments. It's still fascinating to see the ingenuity and engineering that went into this incredible machine that was unfortunately used for such a destructive purpose.

Also - if you can find it - the BBC made a great documentary about Operation Crossbow and how the allies used 3D reconnaissance photographs to help find and destroy V1 and V2 launch sites. Click here for info and clips from the programme

Flying Wing

The second WWII miniature we've released is the Horten Ho 229.

This is our first aircraft and it's a doozy. The Horten Ho 229 was a prototype jet powered bomber from 1944. I think it looks quite futuristic. Not just Sci-fi but Sky-fi! 

It's a is a 1:144 scale miniature and measures 11.5cm x 5cm x 1cm.

Part's require preparation like the removal of mould lines or filling of tiny air bubbles before painting.

We've already sold a few of these models and the model makers who have bought them have given some fantastic ideas for other WWII aircraft they want made, so expect some more flying marvels in the future!

You can find this miniature flying wing on eBay right here. 

Other WWII Miniatures

Here is a list and links to the other WWII miniatures we've made...

Future Plans

We plan to make a few more 1:144 miniatures as well as a launch platform for the 1:100 V2 rocket. Also in a month or so we should have our first 1:56 scale WWII miniature compatible for players of Bolt Action! 

Also, along the way we will be making some more TT Gauge train items and a few science fiction items for you to enjoy.

LINKS

If you bought one of our Police Box models and got rather messy painting it up, why not get clean with some TARDIS soap from the delightful Design by Fee. And while you're there, check out her etsy shop!

On the NZ120.org website a fellah is making a 'What if' train layout for a place in New Zealand called Golden Downs. He's setting it in the mid 70's. It sounds like an interesting project and if you want to read about his progress or if you have any photographs of the area from that era, head over to http://www.nz120.org/forumtopic/downs

Yeoman Models have been mentioned on the Dorset 3mm society website!
I'd like to thank them for their lovely comments about the TT Gauge phone boxes and post boxes that we've made. You can also see their painted RAC phone box here.

Epilogue

Well done if you've made it to the end of today's blog. It's been quite a long one; And thank you to everyone who's bought from us over the last few months. We've now smashed through the 100 feedback score on eBay! Keep your eye out for more miniatures from us and I'll speak to you again soon.


Saturday, 6 April 2013

Great Western Railway

Hello,
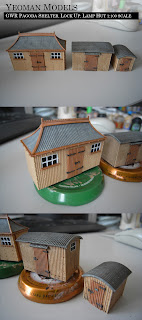
Got few Great Western Railway miniatures to show you this post. Us folks at Yeoman Models have now made three 1:100 scale buildings for your TT Gauge train layout or maybe to use in an urban battlefield with Flames of War. Like The Three Bears of Goldilocks fame, these buildings are small, medium and large.

Pappa Bear is the GWR Pagoda shelter...
http://www.ebay.co.uk/itm/121088676417?ssPageName=STRK:MESELX:IT&_trksid=p3984.m1555.l2649

Mummy Bear is the Lock up Hut...
http://www.ebay.co.uk/itm/121088675543?ssPageName=STRK:MESELX:IT&_trksid=p3984.m1555.l2649

And finally Little Baby Bear is the Lamp Hut...
http://www.ebay.co.uk/itm/121088675684?ssPageName=STRK:MESELX:IT&_trksid=p3984.m1555.l2649

I was asked to make these by the fine folks The 3mm Society and much thanks goes out to the society members who supplied me with detailed drawings and photos of these buildings to help me make the miniatures as accurate as I could.

Someone at The 3mm Society ordered a set of these buildings painted. Here's photos of my efforts.


It was very difficult to get the colours correct and there was a bit of too and fro until I finally hit on the right paints put on in the right way; but I'm very happy with the results and I think we got the colours just right.


As you can see, I made the Lock Up and Lamp Huts more dirty than the Pagoda Shelters. The Pagoda Shelters would be on the train station platforms and would have been better taken care of.

Dorset 3mm Society Blog

If you are interested in 3mm Model Trains then I can recommend The Dorset 3mm Society Blog. It's updated regularly and has plenty of good photos, schematics, layouts, and modelling tips 'n' tricks!

Mixed Traffic

As we are talking a lot about 3mm Train modelling this post, I would also like to say that Yeoman Models was mentioned in January's edition of The 3mm Society's magazine Mixed Traffic! There was a review of my Nissen Hut and a photos of the 1:100 Phone boxes. Thank you Geoff for writing about my miniatures in the magazine!

Epilogue

Well that's all for now. Next post will be about the WWII miniatures we've made. See you all then!